Adding a floating notification bar to your blogspot theme is very helpful as it can easily get the attention of your visitors to a particular post or to a particular affiliate link thereby increasing the number of views and maximizing the affiliate sales using the affiliate links.By using a connect link like google + in your fixed notification bar,you can also grow your followers in that particular social media.This bar can be added by using plugins like sticky bar in Self hosted WordPress Blogs but for blogspot we have to add the code manually.In this post ,i have made a tutorial on how to add floating notification bar similar to shoutmeloud to your blogspot template.
Adding a floating notification bar to blogger.com:
Here is a screenshot of how the floating bar would look like after adding it to your blogspot template.This floating bar is transparent black colour with a blinking(only in Firefox) yellow colour text link arranged in the center.
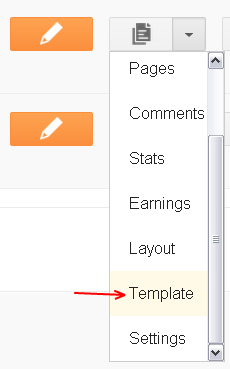
1.Login to your new blogger dashboard and click on more options to the right side of your blog for which you want t o add the floating bar and choose Template>Edit HTML.
Note:Backup your blogger template file using the download template option before editing the code.
2.Find the below code in your template file using the Ctrl+f function of the browser.
]]></b:skin>
3.Now paste the following code right before the above code mentioned in step 2 in your blogspot template
#stickybar{background:url('https://1.bp.blogspot.com/-U6wtLcekRPo/TylFGejyYCI/AAAAAAAAADU/pRGXZ1M_rnE/s1600/headline-bg.png') repeat; color:#fff; margin:0 auto; border-top: 1px solid #000; height:30px; font-size:12px; position:fixed; bottom:0; z-index:1000; width:100%;border-top-left-radius:20px;border-top-right-radius:20px; display:block;}
#stickybar:hover{background:#333;}
#stickybar a{ font-weight:700; text-decoration:blink; color:#fe0; border-bottom:1px dashed; }
#stickybar p{line-height:30px; font-size:12px; text-align:center; width:95%; float:left;}
#stickybar p a{ text-decoration:blink; color:#ffcc00; border-bottom:1px dashed;}
#stickybar li.widget, #stickybar  li.widget p{margin:0; line-height:30px; list-style:none; font-size:12px; text-align:center;}
#If the floating bar is not extending its width to the entire page span or if you want to decrease the width and height, you can do it by changing the height,width and margin values in the code accordingly.
#The headline-bg.png image is uploaded to picasa via blogger.com which is used in the above code.For safety you can also download the image to your blog and use that URL instead.Even if that image is deleted,your design will not be affected.
4.Now find the <body> tag in your template code and add the following HTML code below/after the <body> tag .
<div id='stickybar'>
<li class='widget'>
<p>Join us on <a href='https://plus.google.com/107985922905821624339' rel='nofollow' target='_blank'>Google+</a></p>
</li>
</div>
Screenshot on how to add the above code
Note:You can change the text link according to your wish.To do that just replace the Link Url text in the above code with your own link and edit the Join us on and google + text.
5.Now save your template by clicking on the save template option.
That’s it.You did it 🙂
Also look at
Floating share button for thesis theme
Note:If you are a thesis theme user,you can subscribe to us to receive updates for adding a floating top bar to thesis theme.
Hope you have added the transparent notification bar to your blogspot theme successfully.If you have any problems, do contact via comments,i will help you fix it.Thanks and Happy blogging:-)


I am looking for demo!! where is the demo?
You can see the demo here http://www.mytechshout.blogpsot.com .
I’m not liking it and i think your readers would also not appreciate it as it’s over your content. Difficult for someone to read from where you start.
Thanks for your opinion Irfan.You can add the bar to the top if its disturbing the readers so that it won’t affect the reading.Just change the code to float to top.
The notification bar looks great! Is there a way to have it appear only once a week, or once a day?
Ya you can do it.For that you have to add some extra code to your blogger template.But it can be done easily in WordPress using plugins.Thanks
Then Please Share That Extra Code For thesis 🙂